Efficient sales processes are the cornerstone of scalable growth. However, process inconsistencies often occur when sales teams grow quickly or because of gaps in training and documentation.
To address these challenges, sequences in Dynamics 365 Sales provide sellers with contextual guidance for what should happen next to progress a deal.
What are Sales Sequences in Dynamics 365?
Sequences enable sales managers and sellers to create a series of predefined actions, such as prompts to send emails, make calls, or schedule tasks.
These are automatically triggered in the specified order to guide sales reps through each process step. This not only improves productivity by reducing admin but also standardises sales journeys to drive consistency.
Within a sequence template, branches can be defined, helping sellers be agile in reacting to customer responses. Branches can be personalised to reflect the type of prospect and the process stage.
How are D365 Sales Sequences licenced?
Sequences are part of the sales accelerator feature for D365 Sales. This is available with Dynamics 365 Sales Enterprise, Sales Premium and Microsoft Relationship Sales licences.
For Sales Enterprise licences, up to 1500 records can be connected to a sequence each month.
What security roles can manage Sequences?
Sales sequences can be configured by users in the roles of System Administrator, Sequence Manager, or Sales Manager.
Creating Sequences
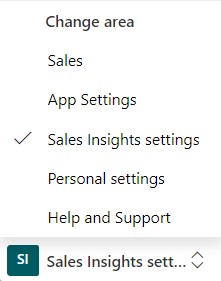
In the Sales Hub, access the Sales Insights Settings on the bottom left of your interface:
Then, navigate to Sales Accelerator > Sequences on the left menu.
To get started, select an existing sequence or click New to begin creating your own.
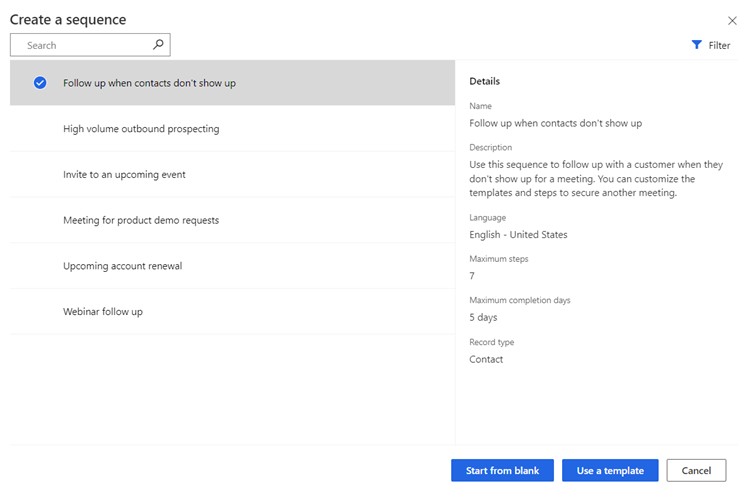
You can start from blank to create your unique sequence or adapt one of the Microsoft templates.
In this example, we will select ‘Follow up when contacts do not respond’ template.
The pop-up window provides information about the sequence configuration settings. This will include the step count, duration and which entity is involved in the sequence. Sales sequences allow you to target Contacts, Leads, Accounts and Opportunities.
Once you’ve decided on your configuration, it’s time to add/remove steps and configure actions in your sequence.
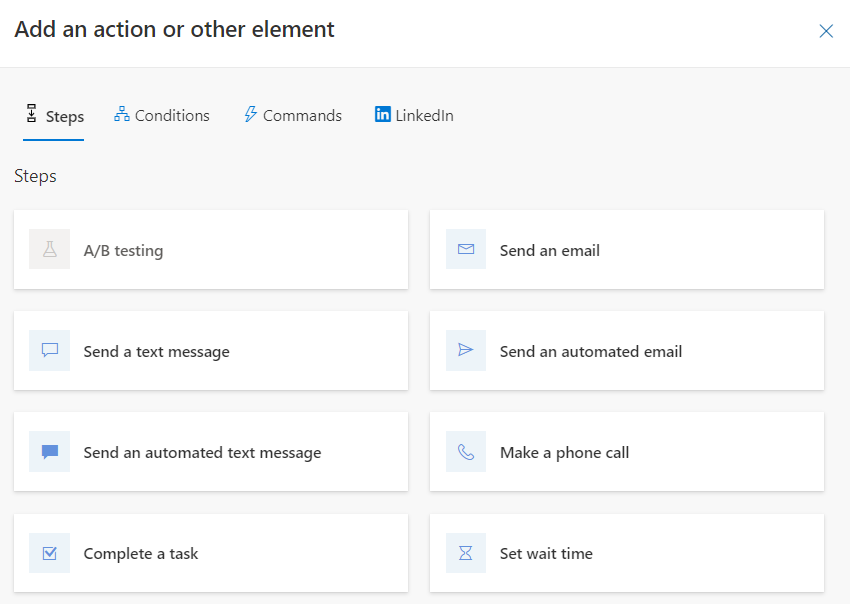
By selecting a ‘+’ icon on the sequence builder, you can define steps, such as sending an email or completing a task.
Adaptive Sales Sequences
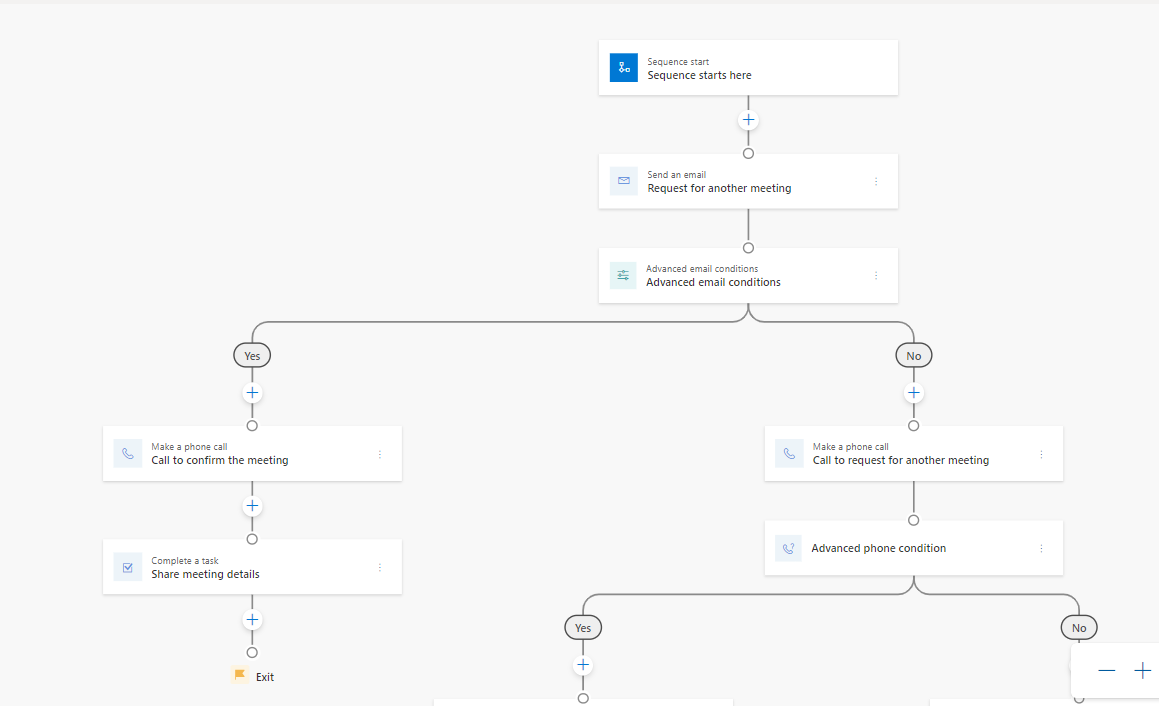
Conditional steps are added to a sequence to define the next action if a condition is either met or not.
Within these adaptive sequences, you can branch or end a sequence based on a conditional yes/no result.
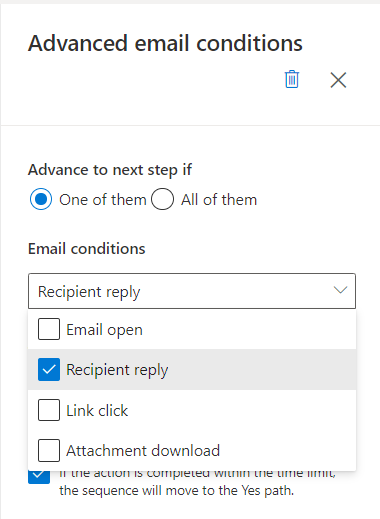
Conditions are available for email, phone call, field value and business process stage. For instance, how a sequence proceeds could depend on whether a customer has opened an email. Using a field value criteria, the process could only continue if a record matches defined attributes for an address or job title.
Sequences also offer the option of using commands to activate other sequences and trigger recommended actions that are displayed in the work list and ‘up next’ widget.
Lastly, you have the option to integrate with LinkedIn Sales Navigator. This provides the capability to add a LinkedIn activity to a sequence. Examples include sending an inMail, making a connection request, asking for an introduction or completing research.
These commands contribute towards helping sellers to better understand customers before engaging and moving to the next step.
You can select each existing step to refine the process to match your needs. When selecting a step, a panel will surface on the right hand of your interface, allowing admins to customise further, such as adding conditions to proceed or selecting an email template.
Administer your Sequences
The top menu enables you to review the configuration of your sequence. Under properties, you can update the description and who the sequence is assigned to, such as the record owner.
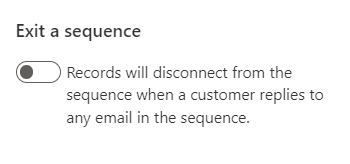
You can also set the sequence exit criteria from the top menu. For example, a record could be disconnected from a sequence if an email reply is received.
Once the sales administrator is satisfied with the configuration setup, they can save and ‘Activate’ from the top menu.
A helpful feature is version history. When sequences are edited and saved, a record will be created, and the previous versions can be selected. This enables you to manage variations without needing to create a whole new sequence and preserve a record of every version.
Linking Sequences with Your Sales Records
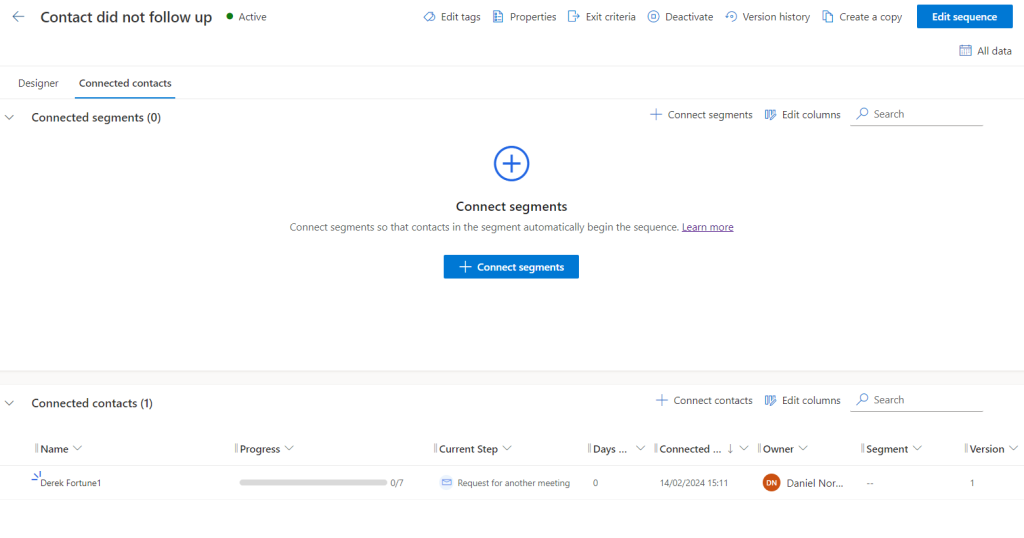
The next step is to connect records to the sequence, which can be performed in two ways.
Firstly, connections can be completed manually by selecting the specific record. Alternatively, by selecting a segment, a record will enter a sequence when criteria is met.
When a record is added, it will appear in the list above, displaying their progress, current step and the owner.
Using the work assignment feature, you can create segments of records based on conditions and connect these to sequences that perform actions on matching records.
Segments are a group of records that meet your defined criteria. For example, you could create a segment of leads for a specific product or service.
To create or edit a segment, navigate to ‘Work Assignment’ on the left menu panel. Additionally, you can set the priority of which segment will take precedence over another and set assignment rules.
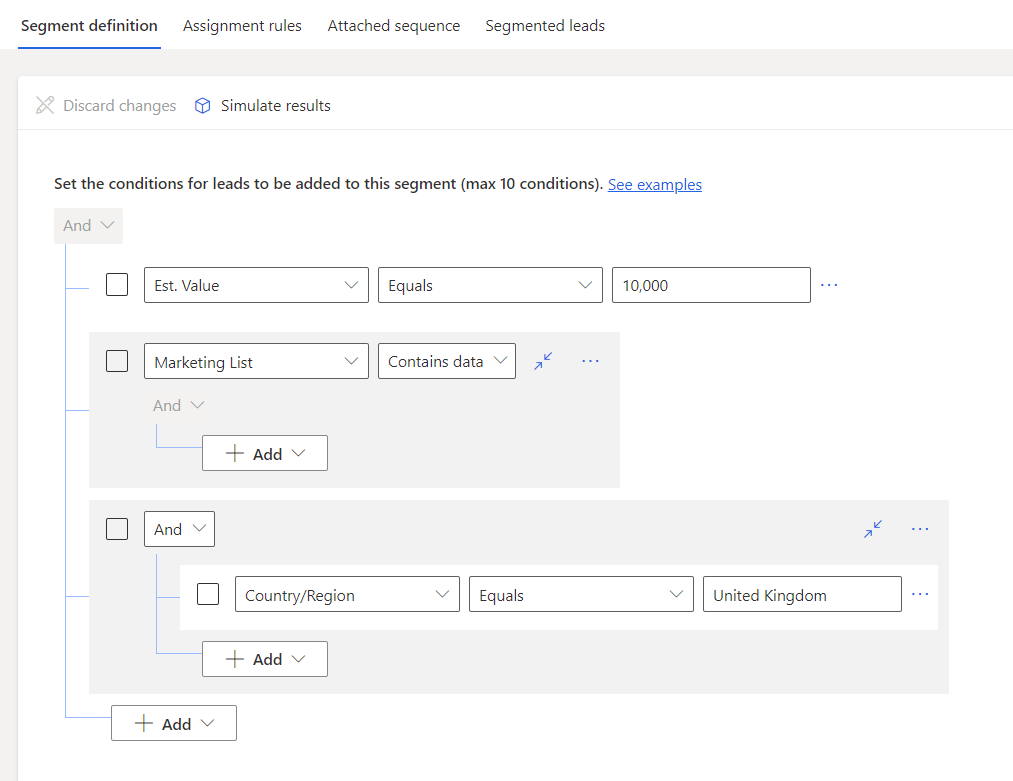
By clicking an existing segment or creating a new segment, you can choose the criteria of how records are brought into the segment.
You can choose which fields are used and the conditions to meet the criteria. For the example above, our lead segment definition includes the estimated value and country fields.
You can choose if multiple conditions are all required for the criteria to be met. Alternatively, you can select ‘Or’, where if any of the individual conditions are met, they’ll be added to the segment.
To preview the segment query, select ‘simulate results’ to check the accuracy of the segment according before this is published.
Sales Sequences in Action
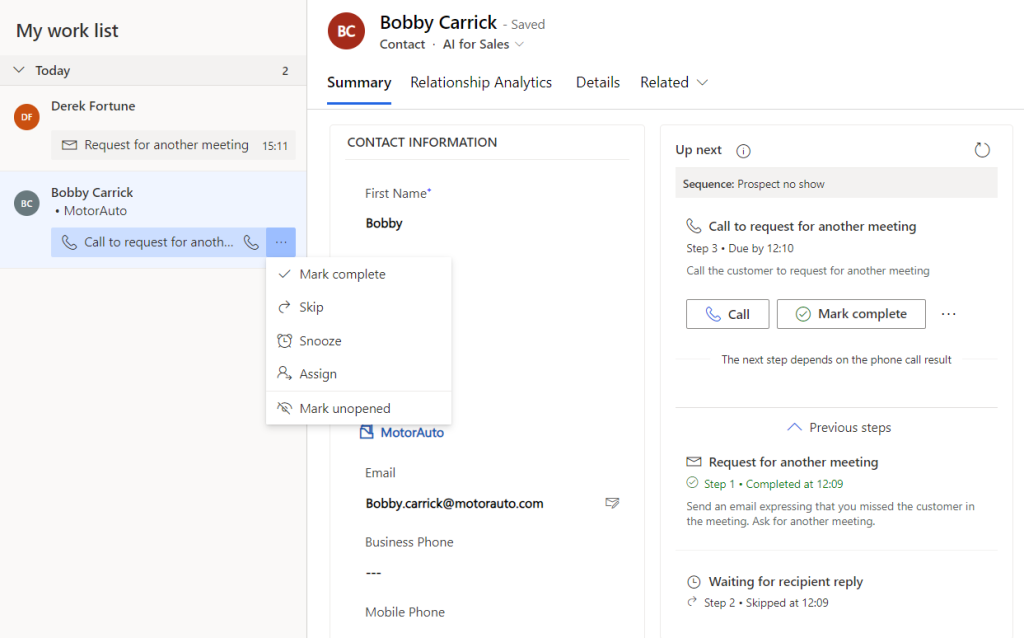
Once sequences are configured and activated in your Dynamics environment, sellers can pick up these actions by navigating to the sales work list.
Work lists to help sellers focus time and effort by prioritising assigned tasks.
For each sequential item in the work list, you can quickly apply actions, such as Mark Complete, Snooze or Skip. Depending on the next step, sellers can perform their action, such as making a phone call or sending an email.
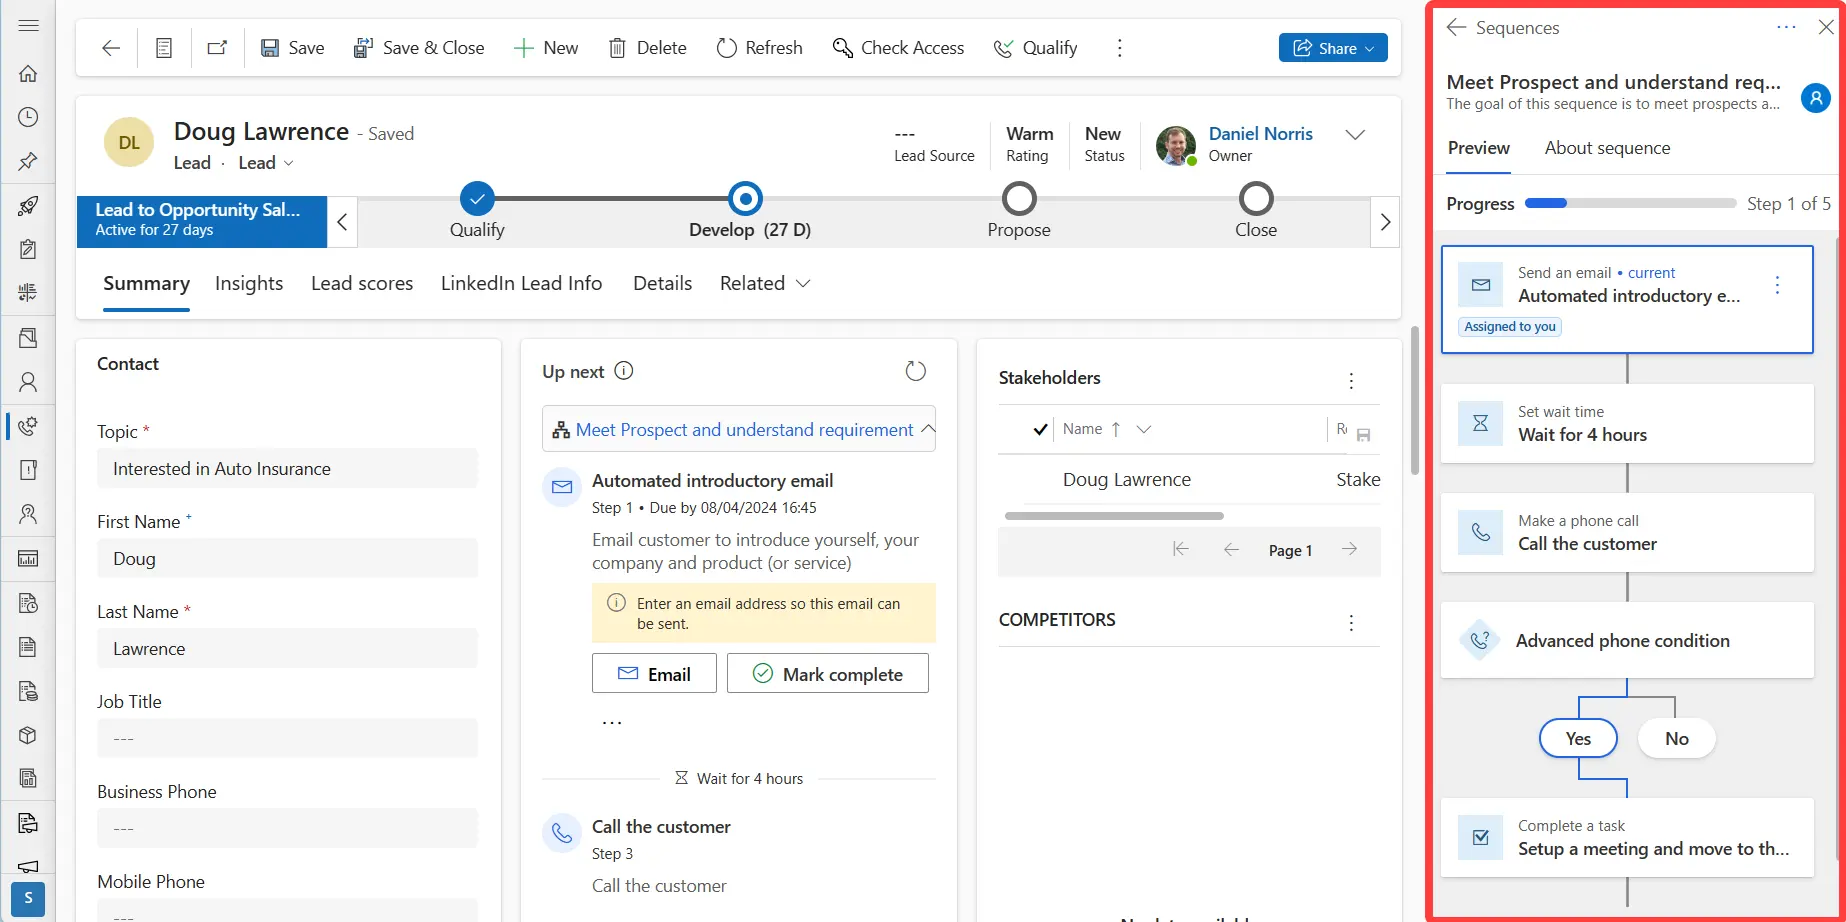
The sales form will appear when selecting a record from the work list. Here, sellers can perform tasks, view previous steps and see additional information about the sequence.
Sequence Steps in Dynamics Sales
The seller has complete visibility of each sequence without navigating away from the record. The sequence is displayed with the next action at the top and consequent steps flowing to the bottom of the screen. A progress bar is displayed above the steps showing how far the lead is in the sequence journey.
You can also use the ‘About Sequence’ tab on the panel for contextual information on a sequence. This displays which seller the sequence is assigned to. It also shows the maximum steps involved, creation date and average sequence duration.
Sequence Insights
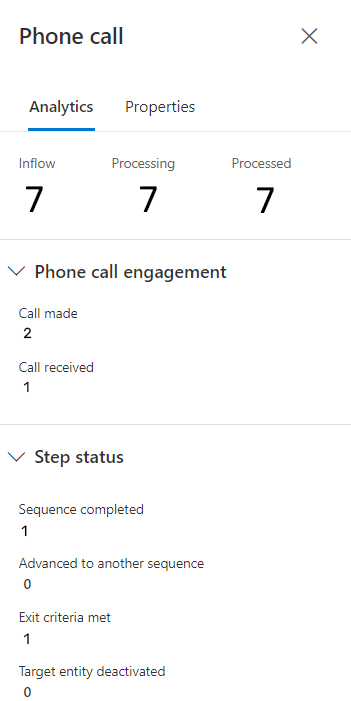
Sales teams will want to understand the performance of each of their current sequences. How many calls have been generated? Has there been many email clicks? You can view the analytics of each individual step in the sequence to understand at a granular level where people are engaging and dropping off of the sequencing process.
To assess the performance of a Sequence, you can see the success rate with a snapshot view.

Working with Sales Sequences
Sequences bring automation to minimise manual tasks involved in carrying out standardised communications and processes. They are an ideal solution to support seller onboarding, process streamlining and focus on priority tasks to help everyone sell efficiently.
Sequences arm sales managers with accessible tools to help their team prioritise daily activities and focus on selling to speed the sales process. As the adoption increases, we see sequencing as a core Sales Hub feature to increase productivity and better align seller activities with organisation processes.
Sales Sequences Video Demonstration
Watch our video below to see an overview of sale sequences.
Video Transcript
Sales Sequences help sellers reach positive outcomes by following your sales processes and best practices. Working with Sales Accelerator helps provide sellers with clarity by recommending the next action for their assigned leads, accounts, contacts, and opportunities. It also helps achieve greater consistency with a refined sales process and quickly send emails or be prompted to take specific actions such as phone calls.
In the form view itself, we also have the option to mark complete, send an email or assign, snooze, or skip the step. We can also add a note. By selecting the link at the top, we have a preview of all the steps in the sequence. We can toggle the different branches available to us and scroll down to the end of the sequence flow. If we select “About Sequence,” we can see the overall description and see the list of maximum steps for this sequence.
Sellers can also use the filter and sort options to manage their lead workload. On your screen, you can see we can filter by the due date, record type, and activity type. This empowers sellers to prioritise and organise their work process and focus on the most important records first. We also have the sort option which allows us to show which records should show first, such as score, name, or due date.
Let’s examine the process for sales administrators who may be responsible for creating the sequence process steps for sellers to use in Sales Accelerator. When you create a sequence, you define the activities you want your sellers to perform and the order to perform them as they handle records. This guidance lets sellers concentrate on selling and gives them a better understanding of what to do next.
Sales administrators can add tiles such as sending automated emails with an attached template. We can also add tiles such as a wait timer which are configurable. We can branch the sequence based on the conditional rules, for example using the advanced phone condition. The steps will change depending on if the phone call was made or received. We can also add conditional branches based on updating field values. In this example, we took the decision for the prospect to advance when the lead grade is set at A. This indicates that they are responsive to engagement and therefore the seller should send them an email next.
There are plenty of other field value choices to pick from such as decision maker, job title, lead source, and other standard Dynamics lead fields. In this next example, we will configure this by budget and have set the prospect to advance when it’s set to ‘May Buy’. Another option available to us is to update fields as a next step in the sequence. This is useful for enabling sellers to quickly update records based on a standard process. This is much more efficient and methodical compared with manually navigating through lead records at different stages of the sales cycle. In this instance, we’ve decided to pick the sales-ready field to update. This might be useful after a conversation with the prospect and allow other people such as sellers or marketers to understand that they are now ready for making the next step to purchase a product or service from your business.
The sequence designer also integrates natively with LinkedIn Sales Navigator. The tile options available to us are complete the research, informing the seller they need to understand the prospect or account they’re engaging with. We can also add an introduction option for making the initial step. We can also create prompts for getting connected and sending a LinkedIn email. We’re able to complete a description on the right-hand panel to provide further context to the seller. Supporting sellers to organise their workload, not just through emails and phone calls but also prompting them to take action on LinkedIn enhances their ability to engage with prospects and help them to convert to buyers.
Let’s explore different ways Dynamics Sales allows us to connect records to sequences. When navigating to a lead record, selecting the sequence dropdown on the command menu provides the seller with the option to connect the lead to active sequences. Each sequence has a preview of the steps on the right-hand side providing a deeper understanding of the journey the prospect will go on. When we have chosen the sequence, we can quickly attach the record to it. We can even connect records to multiple sequences at the same time, which is useful for businesses who have complex sales cycles and businesses offering a wide variety of products and services.
From the sales form, we can also assign sequences to other people using Dynamics Sales. You simply need to navigate to the command bar, choose the sequence from the menu as we illustrated before, then finally search for a different user in your system. When you’ve picked a person to assign the sequence to, select the assign button. We can also connect records to sequences in the Sales Accelerator admin area. When servicing the lead connecting interface, we can select by bulk, allowing administrators to quickly add many leads at once. When records have been added, we’re provided with contextual information such as the owner, how long they’ve been on the sequence, and the current step they are in the process.
We can also add records to sequences in bulk using set criteria with segments. Choose from field values such as status, lead grade, or source campaign to collect records in your system that meet these parameters. You can simulate the results to get an understanding of how many records will be inside a segment. This is a powerful tool and using segments as the approach to connecting records to sequences can help you streamline the sales process and improve consistency.
Lastly, let’s take a quick look at the exit criteria for sequences. Sequences will end when any endpoint in a flow is reached. But an exit criterion can also be added based on email engagement in response to messages sent in a sequence. You can do this by navigating to the exit criteria option on the command bar. Opening this panel provides a toggle option to disconnect records on a sequence when a customer replies to any email in one of these steps. Businesses have diverse sales processes and strategies, so it’s useful that Dynamics Sales offers flexibility to control this option.
Sales sequences are an effective way to increase consistency by giving sellers a defined order of actions they should perform on leads and other records. By connecting activities and other actions into sequences that reflect frequent sales scenarios, sellers have a better understanding of what needs to happen next so they can consistently progress deals and prospects in line with your processes and best practices. If you’re interested in learning more about Sales Sequences for Dynamics 365 and how this feature can be configured for your organisation, please get in touch and don’t forget to subscribe to the ServerSys YouTube channel for more updates about Dynamics and the Microsoft.
Next Steps
Sequences help sales professionals by providing structure, freeing up time to build relationships and close deals. Whether it’s sending timely emails, making phone calls, or setting tasks, sequences ensure that no prospect slips through the cracks.
To explore how sequences could work for you, contact us today to learn more.
Further information on Microsoft Learn
- Sales Insights configured for your Dynamics solution
- Make conditional workflows with Sales Sequences

