Understanding views is essential for effectively using Dynamics 365. If you’re new to Dynamics, this post will guide you through the basics of working with read-only grids.
In Dynamics, views display lists of records for each table, such as accounts, contacts, leads, or cases. Each view filters data into manageable lists, helping you quickly find the necessary information.
Don’t miss our detailed guide. See a preview below and download this free resource today – no registration required.
Types of Dynamics 365 Views
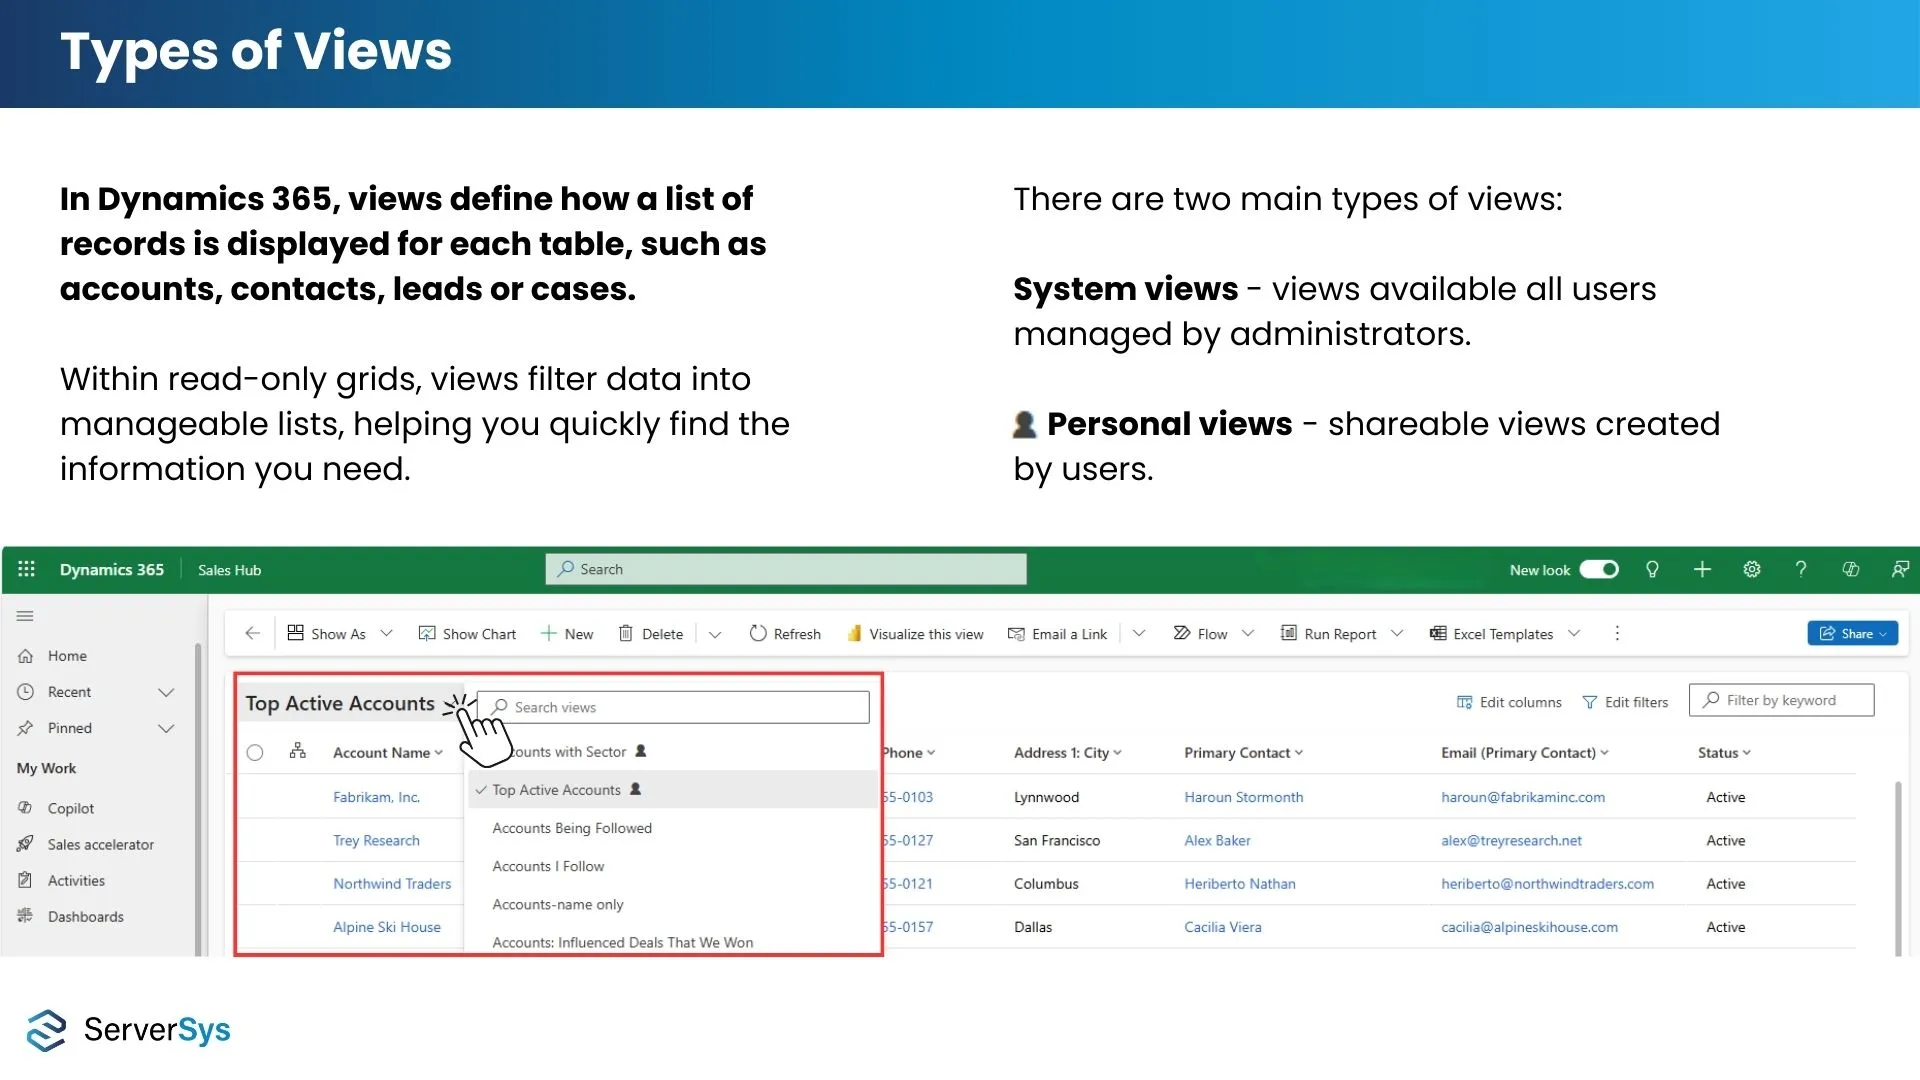
There are two types of views:
- System views – default views in the application that are available to users and managed by an administrator.
- Personal views – created by users that can be shared with other users and teams. In the view selector, these are prefixed with a user icon.
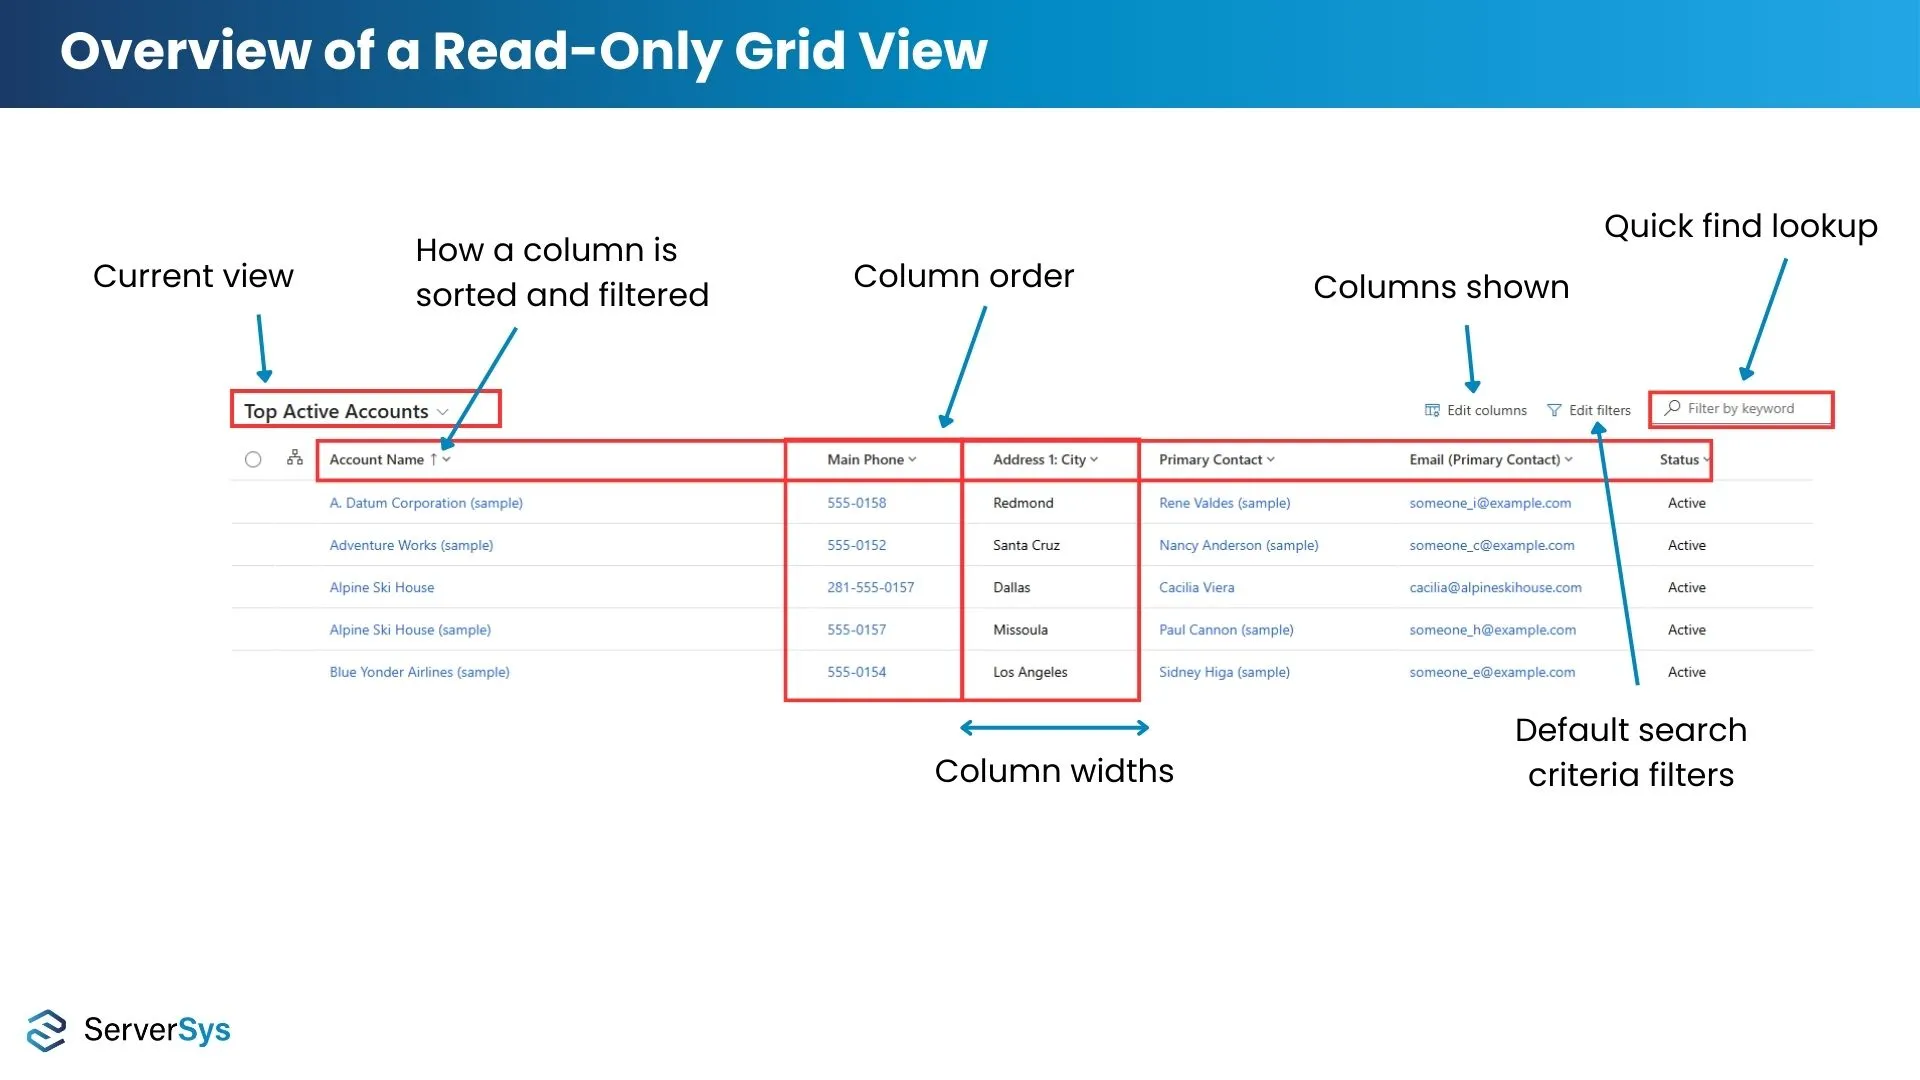
Key elements in a Dynamics 365 view include:
- The selected view.
- Search criteria to filter the view.
- Columns shown.
- How each column is sorted and filtered.
- The order sequence of columns.
- The width of each column.
You can use or customise each of these elements to refine your views, enabling you to find the information you need quickly.
View Selector

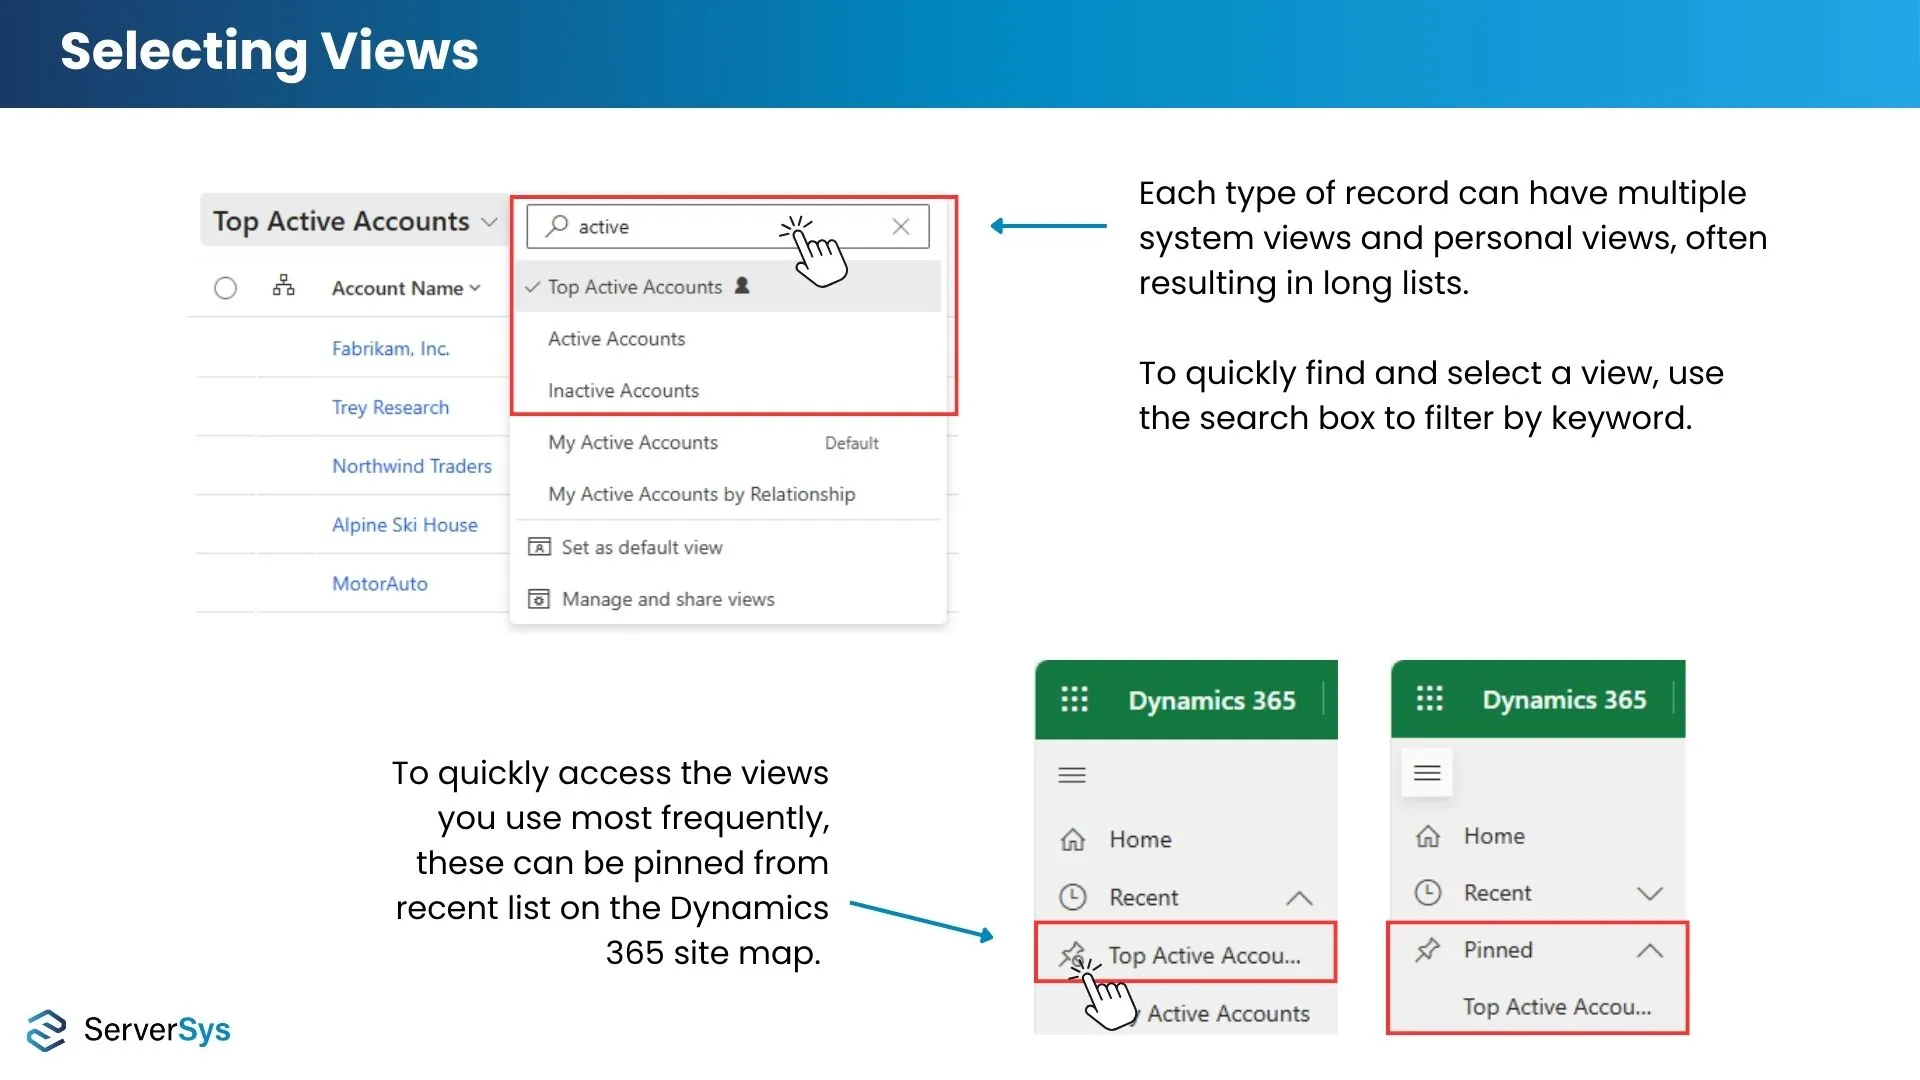
Let’s start with the view selector. Because multiple views are available on each table these lists can be lengthy, so here are some tips to improve your experience.
- Use the search box in the view selector to find views by a keyword (shown above).
- Check if the default view for each table you work with is relevant.
- Save time by pinning your frequently used views from the recent list on the sitemap.
- Review the default sort options for your views listed in the selector. For example, you can set it to show personal views before system views. See below for more details.
- Views can be hidden to declutter your view list. For example, hide system views you don’t need.
- Hide, deactivate or delete any personal views that are no longer needed.
To further reduce cluttered lists of views, Microsoft is introducing functionality allowing admins to share system views by security role.
Creating views using Copilot chat
Watch our demonstration of creating custom views by starting with a chat prompt.
Filtering views by keyword
 (22)")
You can use the quick find search to find rows by filtering records across columns. By default, this will search columns for entries beginning with the filtered keyword.
Your Dynamics environment may also enable searches that start with an asterisk (*) to match columns containing a keyword. However, these types of searches are typically slower and may be disabled by administrators.
These keyword searches only work across columns enabled for quick find. Click on the quick find box to see which columns are checked. Check with your administrator if you want to allow additional columns to be accessible in quick find searches.
Filtering view columns

In addition to controlling the sort order, you can apply a condition to each column for filtering view rows.
- Choose a condition using keyword rules including ‘equals’, ‘does not equal’, ‘does not contain’ or ‘ends with’. Or use ‘contains data’ or ‘does not contain data’ rules.
- After applying your filter, you’ll see an icon highlighting the active filter in the column. You can click on this to edit or remove the filter.
- Only one condition can be applied to filter a column, but filters can be used across multiple columns in your view.
Creating a personal view
To add a new view in Dynamics 365, start by customising an existing system or personal view similar to your desired layout.
Customising columns

Determine which columns are showing in your view by clicking ‘Edit columns’. Here, you can remove any unwanted columns and select ‘Add columns’ to pick additional columns. Scroll down the list to find the appropriate column(s), or use the keyword search.
The available columns are specific to the selected table/entity. For example, on an Account view, the additional options will be Account columns/fields.
However, you can also use columns from associated tables to personalise your views better. To do this, hop across to the ‘Related’ option. For example, on an Account view, a related table could include a primary contact or an originating lead.
Editing filters

Click ‘Edit filters’ to adjust the criteria for displaying rows in your view with options including:
- Creating filters using any searchable field in the selected table.
- Applying standard operators such as ‘contains’, ‘does not contain’, ‘starts with’ and ‘equals’.
- Grouping conditions and including and/or rules.
- Including additional columns from one or more related entities.
Saving new Dynamics 365 views

When you’re making changes to an existing view, an asterisk (*) will appear next to the view name in the selector. The asterisk highlights that you have unsaved changes, so you’ll need to create a new view to ensure these aren’t lost. To do this, open the view selector and select ‘Save as new view’.
Updating views
If you customise a personal view, you’ll see an option to save your changes to the current view.
But when you’ve used a system view as the base for customising a view, you’ll only see an option for creating a new view. An administrator must make any necessary changes to a global system view.
Hiding and sharing D365 views

From the view selector, you can manage and share views.
As noted above, you can adjust the default sorting options to list the available views. You can choose between a conventional A-Z, showing personal views first, or prioritising system views.
Hide unused views and delete or deactivate personal views to declutter your list.
You can also share and manage your personal views with other users and teams.
Grant access by selecting the appropriate permissions for each user/team. Grant permissions for others to edit, delete, and share views in addition to basic read controls. To revoke permissions, untick boxes or delete the relevant user/team.
Want to know more?
If you want help getting the most out of your Dynamics system, we’d be delighted to help. Please get in touch for an initial discussion.